

How to set up a MySQL database for AIDA64?


MySQL e MS SQL sono uno dei numerosi database supportati da AIDA64.
Creazione e configurazione di un database MySQL
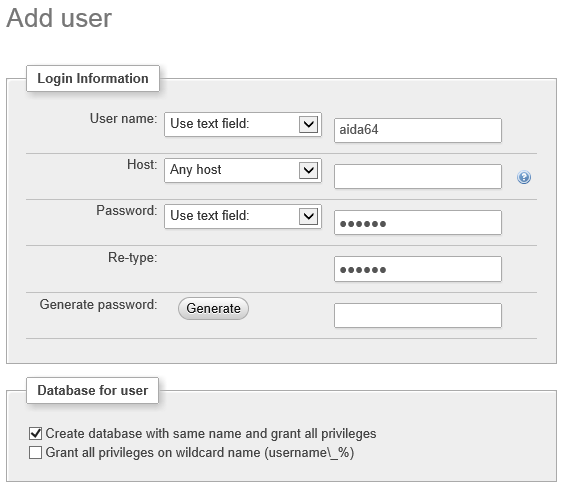
Dobbiamo installare il servizio MySQL sul nostro server (in questo caso, XAMPP), quindi aggiungere un nuovo utente. Dobbiamo inserire un nome utente e una password, quindi selezionare "Qualsiasi host". Possiamo anche creare qui un database con lo stesso nome e concedere tutti i privilegi. Infine, dobbiamo fare clic sul pulsante "Crea utente".
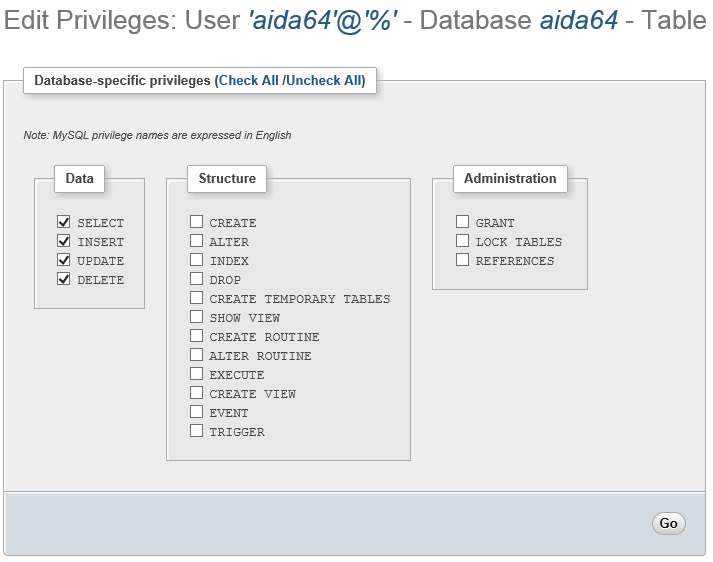
Dobbiamo revocare eventuali privilegi utente aggiuntivi, conservando solo quelli necessari per eseguire le modifiche necessarie per la creazione del report. I diritti di accesso globali a MySQL dovrebbero essere lasciati così come sono (UTILIZZO), ma dobbiamo modificare i privilegi specifici del database, cosa che possiamo fare facendo clic sul link "Modifica privilegi".
Nella sezione "Modifica privilegi: Utente 'aida64'@'%' - Database aida64” finestra che dobbiamo individuare "Privilegi specifici del database" e cliccare su "Deseleziona tutto", quindi nella colonna "Dati" dobbiamo controllare i privilegi che vogliamo. Dobbiamo selezionare SELEZIONA, INSERISCI e AGGIORNA per rendere possibile la creazione del report. Se vogliamo anche consentire agli utenti di eliminare dal database, possiamo selezionare ELIMINA.
Per consentire ad AIDA64 di utilizzare il database è necessario inizializzare le tabelle. Per fare ciò, dobbiamo copiare il “DB - MySQL.sql” query dalla sottocartella "SQL_Schema" ed eseguirlo sul database appena creato.
La query completa per queste impostazioni
Questa è la query completa che crea il database e l'utente con i privilegi richiesti e quindi inizializza le tabelle.
CREATE DATABASE IF NOT EXISTS `aida64` ;
GRANT SELECT , INSERT , UPDATE , DELETE ON `aida64` . * TO 'aida64'@'%';
SET PASSWORD FOR 'aida64'@'%' = PASSWORD('aida64');
CREATE TABLE aida64.Report (
ID INT UNSIGNED AUTO_INCREMENT PRIMARY KEY,
RVersion VARCHAR(255),
RHost VARCHAR(255),
RHostComment VARCHAR(255),
RUser VARCHAR(255),
RLocation VARCHAR(255),
RDateTime VARCHAR(16),
RComplete BIT NOT NULL
);
CREATE TABLE aida64.Item (
INum INT,
IPage VARCHAR(100),
IDevice VARCHAR(255),
IGroup VARCHAR(255),
IField VARCHAR(255),
IValue VARCHAR(255),
IIcon INT,
IID INT,
ReportID INT UNSIGNED NOT NULL,
CONSTRAINT cnstI1 FOREIGN KEY(ReportID) REFERENCES Report(ID)
);
CREATE TABLE aida64.NextID (
TableName VARCHAR(6) PRIMARY KEY,
NextID INT NOT NULL
);
INSERT INTO aida64.NextID (TableName, NextID) VALUES ('Report', 1);
Installazione di ODBC su ogni computer
Puoi leggere di più sui prerequisiti ODBC di MySQL here.
-È necessario installare un connettore MySQL/ODBC a 32 bit (precedentemente noto come driver MyODBC) su tutti i computer in rete. Questo può essere scaricato da http://www.mysql.com/products/connector/ .
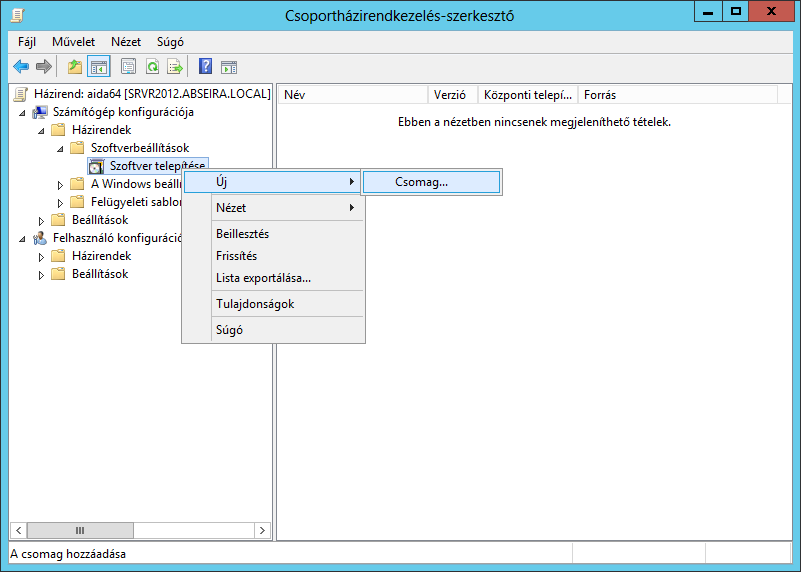
L'installazione è semplice con la Console di gestione dei criteri di gruppo. Dobbiamo creare un nuovo GPO oppure possiamo selezionare quello che già utilizziamo all'avvio di AIDA64. Fare clic con il pulsante destro del mouse sul GPO e selezionare "Modifica".
Qui possiamo selezionare se vogliamo assegnare l'installazione del software a computer o utenti. Per fare ciò, dobbiamo espanderci Configurazione del computer / Policy / Impostazioni del software / Installazione del software nella struttura del menu e seleziona Nuovo pacchetto.
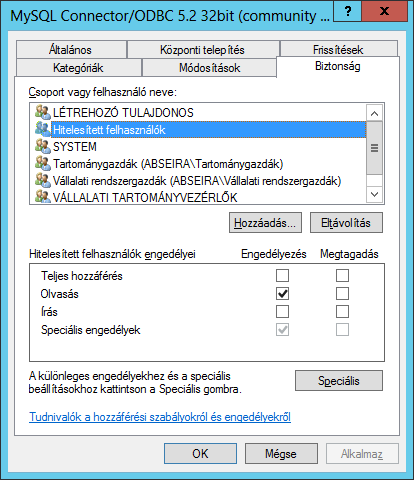
Quindi dobbiamo cercare il file MSI che vogliamo installare. Il file dovrebbe essere disponibile tramite un percorso UNC in una condivisione di rete con autorizzazione di lettura. Fai clic su "Apri", quindi nella finestra "Distribuisci software" seleziona "Avanzate", premi il pulsante OK e fai clic sulla scheda "Sicurezza". Qui, concedi le autorizzazioni di lettura agli utenti per l'installazione. Gli "utenti autenticati" hanno i permessi di lettura per impostazione predefinita.
Quando facciamo clic su OK, aggiungiamo immediatamente all'elenco il nuovo software da installare.

A questo punto non resta che una cosa da fare: aggiornare il Criterio di gruppo sui client. Poiché impostiamo un evento che viene eseguito all'avvio, dovremo riavviare i PC.
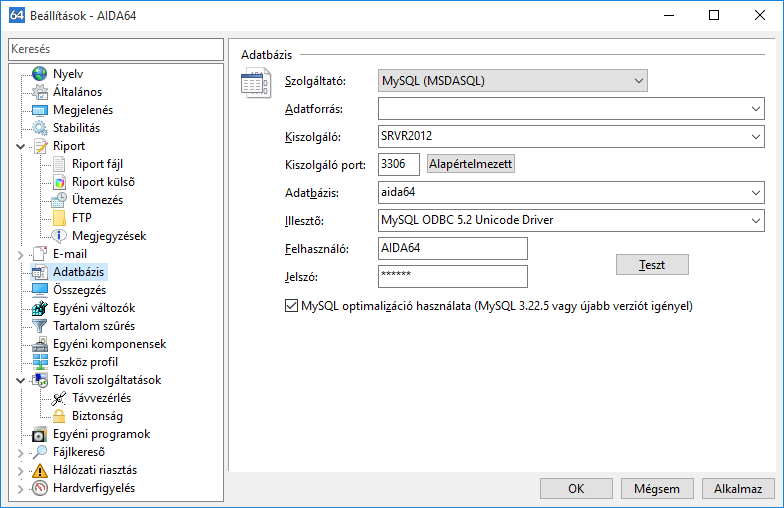
Impostazioni AIDA64
Se utilizziamo un database MySQL, possiamo specificare un'origine dati, sebbene ciò non sia richiesto. Dobbiamo specificare il nome del server o l'indirizzo IP e la porta richiesta per la connessione al database, nonché il nome utente/password dell'utente creato, quindi selezionare il database e il driver. L'ottimizzazione di MySQL, che accelera il processo di inserimento di nuovi record nel database, richiede MySQL 3.22.5 o versioni successive.
Quindi dobbiamo fare clic sul pulsante "Test" per verificare le impostazioni.
Impostazioni del firewall
Infine, dobbiamo controllare le impostazioni del firewall. Dovremmo aprire la porta TCP/UDP 3306 per consentire a tutti i computer della rete di connettersi al database.